Sunday, July 18, 2010

Strangely Simple Risotto (Paella?)


I'm going to a baby shower today, and I needed something subway friendly that could be easily shared, and made relatively inexpensively.  I was going to do a Japanese Kara age (fried chicken) but realized I'm feeling way too lazy to deal with hot oil, so I decided to do a paella.  Or a risotto.  Erm... I did a rice dish.

The difference between risotto and paella seems to be entirely reliant on who you ask.  In theory, paellas don't require the stirring that risotto does, and you make it in a special pot.   I have a paella pan.  Pooh gave it to me, with the little heat trivet and everything.  I know how to use it - but today I was far too lazy to fish it out of storage...

So I used a pot.  And up there?  that's what it looked like.  And it was delish!

So here's what went into my risolla or paetto....


  • Diced brown mushrooms
  • Italian sweet sausage (links, though I suspect loose would have been a better call, could also use diced up chicken, seafood, chicken sausage etc)
  • Peas
  • 1 package of Arborio rice (12 oz)
  • Cherry tomatos, cut into quarters
  • 2/3rds of a visalia onion
  • Handful of garlic
  • spoonful of saffron (pretty sure you can skip this without compromising the taste, but the vivid yellow orange color is thanks to the saffron - not the expensive kind, I got mine cheap at a bazzar in Thailand - would use much less if it was purchased here.)
  • Glob of tomato paste - I used a soup spoon
  • 4 cups of chicken broth
  • cup of water (set this aside, you may or may not need it)
  • Olive oil
  • Salt
  • Pinch of herb mix


In a big pot pour a generous splash of olive oil and warm it up over medium heat.
Add the onions and garlic and stir - keep stirring until the onions and garlic start to become translucent and caramelize. (you can cheat a bit by raising the heat and adding water a table spoon at a time to speed the softening)

Toss in the mushrooms and heat thru (medium heat), add the rice (you may need to add olive oil at this point, the mushrooms tend to soak it in), and stir until the grains start to toast (some will become golden brown).

Add two cups of the broth and stir - now this is where the paella and risotto become two different dishes according to most sources I checked.  Risotto you keep stirring, paella you don't stir as much.  Frankly I stirred because I didn't want it sticking to the pot.  I hate scrubbing pots.

Stir in the tomato paste, saffron, salt to taste and herb mix, and continue to add liquid in small portions as it is absorbed by the rice.  Once all of the chicken broth is added, add the diced sausage and continue to stir and monitor - you may need to add water at this point if the rice starts to stick to the pan.  To preserve the fresh taste of the peas, I added them at this point, with a couple table spoons of water, covered the pot and let it simmer for about 4 minutes.

Check the rice every couple of minutes - you want it to be tender but still a little firm to the bite.

Total cooking time around 30 min.

Enjoy!

Friday, July 2, 2010

Suspiciously easy Popovers


I had no idea how easy this was going to be - some of the instructions are pretty specific, like the eggs actually have to be at room temperature and the popover tin needs to be pre-warmed.  Fail to do those things and you get TOTALLY different (though still edible) results. Why do I know? I tried it.  Naturally.

The photo is from the second attempt.

Now let me say, I purchased this popover pan because upon sorting the recipe I realized they were so easy to make that I could theoretically do it all the time.  We'll see.

That said, you could use ramekins if you have them (the small individual size) or one of those muffin pans for the big muffins, even a cupcake pan, but they're going to be smaller and you may find yourself eating say, 6 instead of like 2.

Ready?  OK

Preheat oven to 425, put the popover tray IN the oven to heat.

You'll need 
  • 1 cup all purpose flour - I understand you could use bread flour, but all purpose works just fine
  • 1 cup whole milk (or 2% if you insist - you need the milk fat though, so no skim)
  • 1/2 tsp of salt - my dr. would love me I'm being so good - I only used 1/4
  • 3 eggs at room temp.  Not sort of room temp, not chilled but not cold, room temp.  I swear it makes a difference, I have no idea why...
  • 2 tablespoons of unsalted butter, melted
  • Pam or nonstick cooking spray (I used a butter flavor one)


Put everything in a mixing bowl, and whisk together.  You'll find yourself with a thin batter - try to whisk out the lumps.
Take the pan out of the oven (careful now - I burned 3 fingers doing this tonight.  I'm an idiot.) and spray the tin lightly with the non stick spray - you need to facilitate the rising and puffing of the dough, plus they come out easier when you're done.
Fill each cup on the pan (or ramekins or whatever you're using) about 1/2 to 3/4 of the way full.
Bake in the oven for 25 min at 425 
At the 25 min mark, turn down the heat to 350 degrees, and bake for another 15 to 20 min till the popovers are golden and fluffed! 

Serve with tons of butter, maybe some jelly?  Using the butter recipe from a former post, I blended in honey in one batch and strawberry puree into another to make flavored butter for the popovers. 

Enjoy!!

Update; 11/25/2010
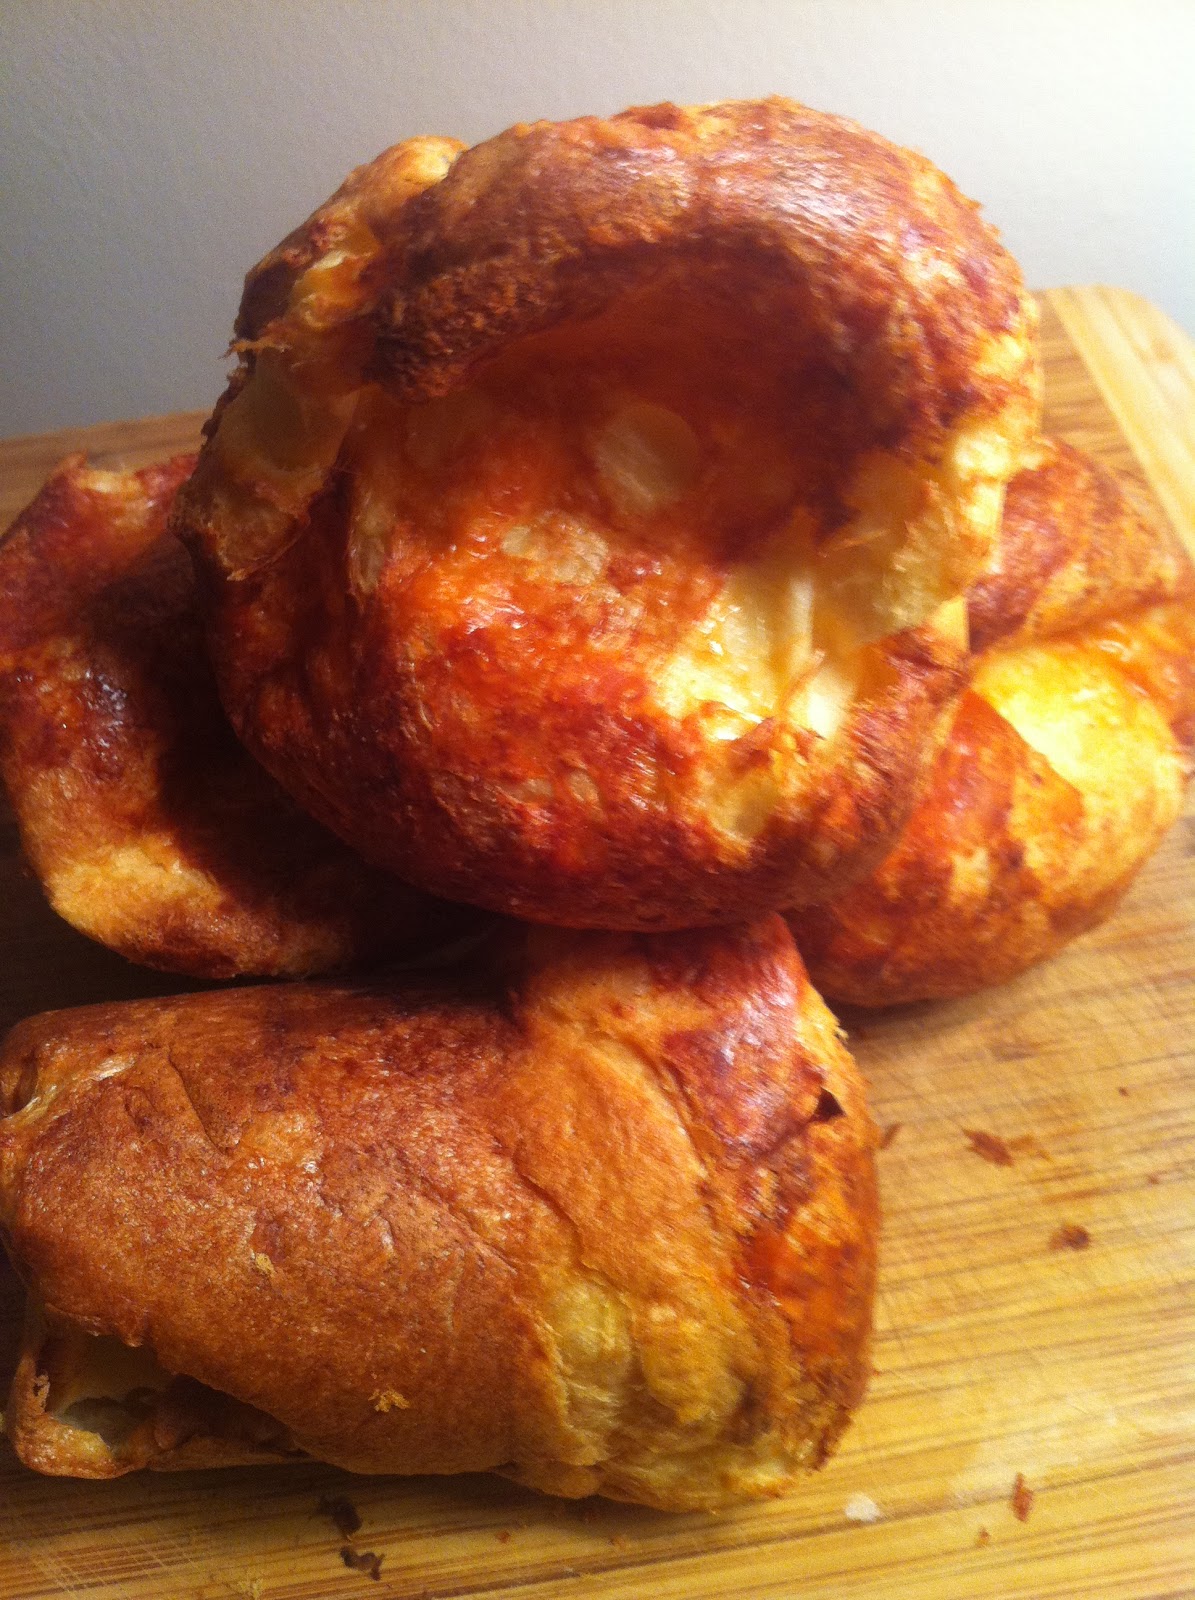
I made a batch today, adding a spoonful of Parmesan on top before putting the popovers in the oven.  HEAVENLY I tell you!!  Look;
Yummy cheesy noms!!! In place of Parmesan, you could use Asiago, maybe Gorgonzola,  any relatively dry cheese should work, dense cheeses will likely make the dent in the top of the popover bigger and could potentially hinder the rising action in the oven though if you're as fond of cheese as I am you'll be willing to deal with the compromise... :)

Monday, June 28, 2010

Creamy delicious homemade butter


This is completely unrelated to anything.  I did it out of sheer curiosity - although now that I've tried it, I might be a convert.  Making fresh butter was way the heck easier than I thought ever - took no where near as long as the shake-a-jar method one of my grade school teachers had us do where we shook a cup of cream in a jar for half an hour.

Once again I employed my mini food processor - a tool I used to wonder why I purchased, now known as my mayo maker and now butter maker.  If you have a stand mixer that would work too, you could probably even pull it off with a hand mixer or whisk but that's not the kind of exercise I want thanks...

Home made butter is creamy and sweet and delightfully lighter than store bought.  Plus since I control the ingredients, I can make it unsalted without any coloring or additives.

For the butter;

2 cups of heavy cream (not half and half - real heavy cream)
salt to taste (or not if your doctor is like mine and also says you're going to have a stroke any second now...)

Pour the cream into the processor, blend the cream.  First it will turn into whipped cream, then if you keep going, you'll see it begin to reduce in volume as the milk fats start to stick together.  Eventually, you'll see the butter start to form crumbles and you'll notice a fair amount of liquid begin to gather - this is the BEST buttermilk you'll ever taste, think of it as a little treat for the cook.

Pour the contents from the mixer into a cotton cloth over a sieve and squeeze to compress and form the butter, and strain the butter milk.  You'll want to squeeze out as much of the buttermilk as possible, it'll help the butter stay fresher longer.

This fresh butter would be fantastic with honey mixed in on pancakes, or chives on a potato - garlic and herbs on grainy, seedy dinner rolls.  All manner of yummy!

Schmancy looking super simple cream puffs

I love these things - they're eggy and rich and light and fluffy all at once - similar to pop-overs which I fully intend to try sometime very soon...

The shells are awesome, you can fill them with all manner of things, I'm going to put a huge scoop of coconut ice cream in them tomorrow for my friend Sophie at work.  She's skinny.  I'm trying to fix that.  Against her will maybe...

Anyhow malicious intent aside, you can fill these with all manner of things - whipped cream and sliced fruit for example, custard if you're feeling fancy, whipped cream for a light treat, ice cream for a cold treat, etc.

To make the puff shells;

Oven to 400 degrees

1 cup of water
1/2 cup of butter (4 oz)
1 cup of flour
about 1/4 tsp. of salt (I use a smidge less.  Dr.'s orders.)
4 large eggs

combine the flour and salt and set aside

in a fair sized pot boil the water, add the butter and melt it down completely, turn the heat down to medium
Add all the flour at once and stir until fully incorporated, and the dough comes away from the sides of the pot - it will still be a little sticky but it should come off the sides relatively cleanly.

Now you're going to start adding the eggs - one at a time.  Upon adding each egg, you'll find the dough gets a little gloopy - keep blending until the dough is smooth again, then repeat one egg at a time until all four are incorporated.  The dough will start to look like this;

Now spoon the dough onto a lightly greased cookie sheet (or a silpat if you are like me and never want to scrape caramelized anything off your bakeware).  I find that this recipe makes about 12 large puffs, you could certainly make them smaller, just keep in mind that they expand when they bake so you need to leave space between them.

Now pop them in the oven - they'll puff and turn golden brown and crisp on the outside in about 15 to 20 min - individual ovens vary so keep an eye on them.  Try to avoid opening the oven though, the puffs can deflate if the oven temp changes too much - peek thru the window on the oven to check and see if they're done;


When they're done, pull them out of the oven and let them cool - now you can either enjoy them just like this - slice them in half stuff them with your favorite filling!

If you want to show off a little you can dip them in chocolate as well.  Melt a bowl of chocolae in the microwave, and gently dip and twist the top of the puff into the melted chocolate.  I dipped about half of them in coconut;


The shells themselves aren't sweet, so you could in theory make a savory puff from these as well - perhaps a filling of salmon with a touch of hollandaise sauce, or a nice tuna salad with celery for texture?
Use your imagination!!

Monday, June 14, 2010

Ginger Orange cheater's ribs


I have to start this post by admitting something.  I cheat.  Bad.  That is to say I am fully aware of the merits of slow roasting ribs until they are falling off the bone.  I have neither the time nor the patience (and it makes my microscopic NY apartment to damned hot) to do it that way.

That said, this is a manageable recipe that you can pull together in time for dinner on a weeknight (ok maybe a late ish dinner but still....)

Fresh ginger, grated - about a table spoon
4 juice oranges squeezed (between one and two cups of juice)
thyme
rosemary
garlic - I like smashed cloves
sage
olive oil
salt and pepper to taste
baby back ribs - about 4 to 6 bones per person 

Oven to 400

In a bowl, grate the ginger - add the orange juice and set aside
rub the ribs with the smashed garlic cloves, then sprinkle with salt and pepper
on a foil wrapped baking pan (I used my lasagne pan this time, but a cookie sheet will do, and foil wrapped so you don't feel like setting yourself on fire later when you're cleaning up), arrange the ribs and sprinkle the fresh herbs liberally about the pan and on the meat.  Toss in a handful of garlic cloves, and drizzle with olive oil.  Take your orange/ginger juice and pour half of it on the ribs coating them nicely.

Pop the whole kit and caboodle in the oven and let it roast at 400 degrees for about 10 min or until the meat starts to brown.  Turn the heat down to 325 (ish), and baste the ribs once with the orange ginger juice.
Leave it alone for about 30 min.

After 30 min has passed, baste the ribs with the remaining orange ginger juice - it'll take about another 30 to 45 min to finish roasting and voila - yummy cheater's ribs!!