Showing posts with label Desserts. Show all posts

Thursday, January 20, 2011

Five min. Fudge


The nice thing about chocolate is it's delicious no matter how it's served.  Or is it just me? And to think I really prefer savory/salty things over sweet any day - so why fudge do you ask?  I'll tell you why!

If you're on Facebook with me, you know I've been obsessed with Marshmallows  lately - the most recent incarnation being a 'red velvet' version, designed to mimic red velvet cake with it's slight cocoa flavor, bright red color and white outer coat.

Combine a fat fluffy marshmallow with hot cocoa and you get yourself a warm melty treat that makes a winter blizzard (we've had three this year so far) look like a sparkly day!
But instant cocoa, while not bad, could be improved upon, and after a little poking around online, I found a couple examples of hot chocolate on a stick!  I had to try making a batch!

Things you'll need;

A batch of marshmallows - whatever flavor you want Marshmallows ;

For the fudge (based on the recipe from Nigella Lawson) ;

  • 14oz of semi sweet chocolate broken up into small pieces (or chips)- I actually use half semi sweet, half unsweetened for the hot-cocoa-on-a-stick, as the marshmallows are mostly sugar, and there's no one readily available to peel me off of the ceiling.
  • 14 oz (one can) sweetened condensed milk 
  • 2tbsp Butter
  • scant 1/4 cup heavy cream (by scant, I mean don't feel compelled to fill the cup to brimming, it can be a bit under quarter cup.  Skip this if you intend to eat rather than drink the chocolate, it's here to make it easier to melt when making hot cocoa.)

In a heavy bottom pot over medium low heat, dump everything in the pot.  Now stir;
It's going to look messy.  Keep going;
The whole mess will suddenly become a glossy fudge paste - you might find it difficult to keep your fingers out of it.  (wouldn't recommend it, you're on the stove, it's going to be hot.  Just saying.)
Turn off the heat - all the bits may not be entirely melted but that's OK you're going to keep stirring until it's all smooth and all the chunks are melted.  Leaving the heat on here is a bad idea as you'll find the chocolate burns rather easily and becomes grainy.  Not pretty.

Dump the whole mass into a pan that you've sprayed with non stick cooking spray - you'll thank me for this later.  If you want to shape the fudge you'll want to let it cool to room temperature, cut it into even portions and dip in cocoa powder then shape;
The cocoa powder makes them easier to handle and keeps them from sticking to one another.  Alternately you can cut the fudge into squares and skip the dusting of powder.

For the hot chocolate on a stick, use a lollipop stick or popsicle stick to skewer one large marshmallow along with one piece of fudge.  Heat milk (not water) until it's steaming - do not boil.  Add the fudge and stir until melted, then top with a marshmallow!


These make great gifts;


Enjoy!!

Monday, November 22, 2010

Coconut Macaroons by the Gentile


Masha needs her macaroons NOW and I don't know if you've ever tried to get between her and her macaroons but it's just unwise so here it is.  Yep. I said it.

Stuff you'll need;

  • One package shredded coconut (about 3 cups) (I suggest the unsweetened if you can get it otherwise they get too sugary)
  • One can sweetened condensed milk
  • Two egg whites - beaten stiff
  • 1 tsp cream of tartar (to beat the egg whites)
  • 1tsp almond extract (or vanilla - that's good too)


Oven to 350

Beat egg whites with cream of tartar until stiff peaks form.  In a separate bowl, combine coconut, condensed milk and extract, forming a thick putty or paste.   Fold the egg white mix into the coconut mix gently (don't want to destroy the egg whites.)

Drop heaping spoonfuls onto a greased cookie sheet (or use a silpat - my favorite tool) with enough space in between for a little bit of spread, bake for 8 to 12 min until the edges become golden brown.

If you really want to be schmancy, you can melt down some chocolate and carefully dip the macaroons into them for a little twist!

The gentile girl brings dessert....Enjoy!!

Saturday, November 6, 2010

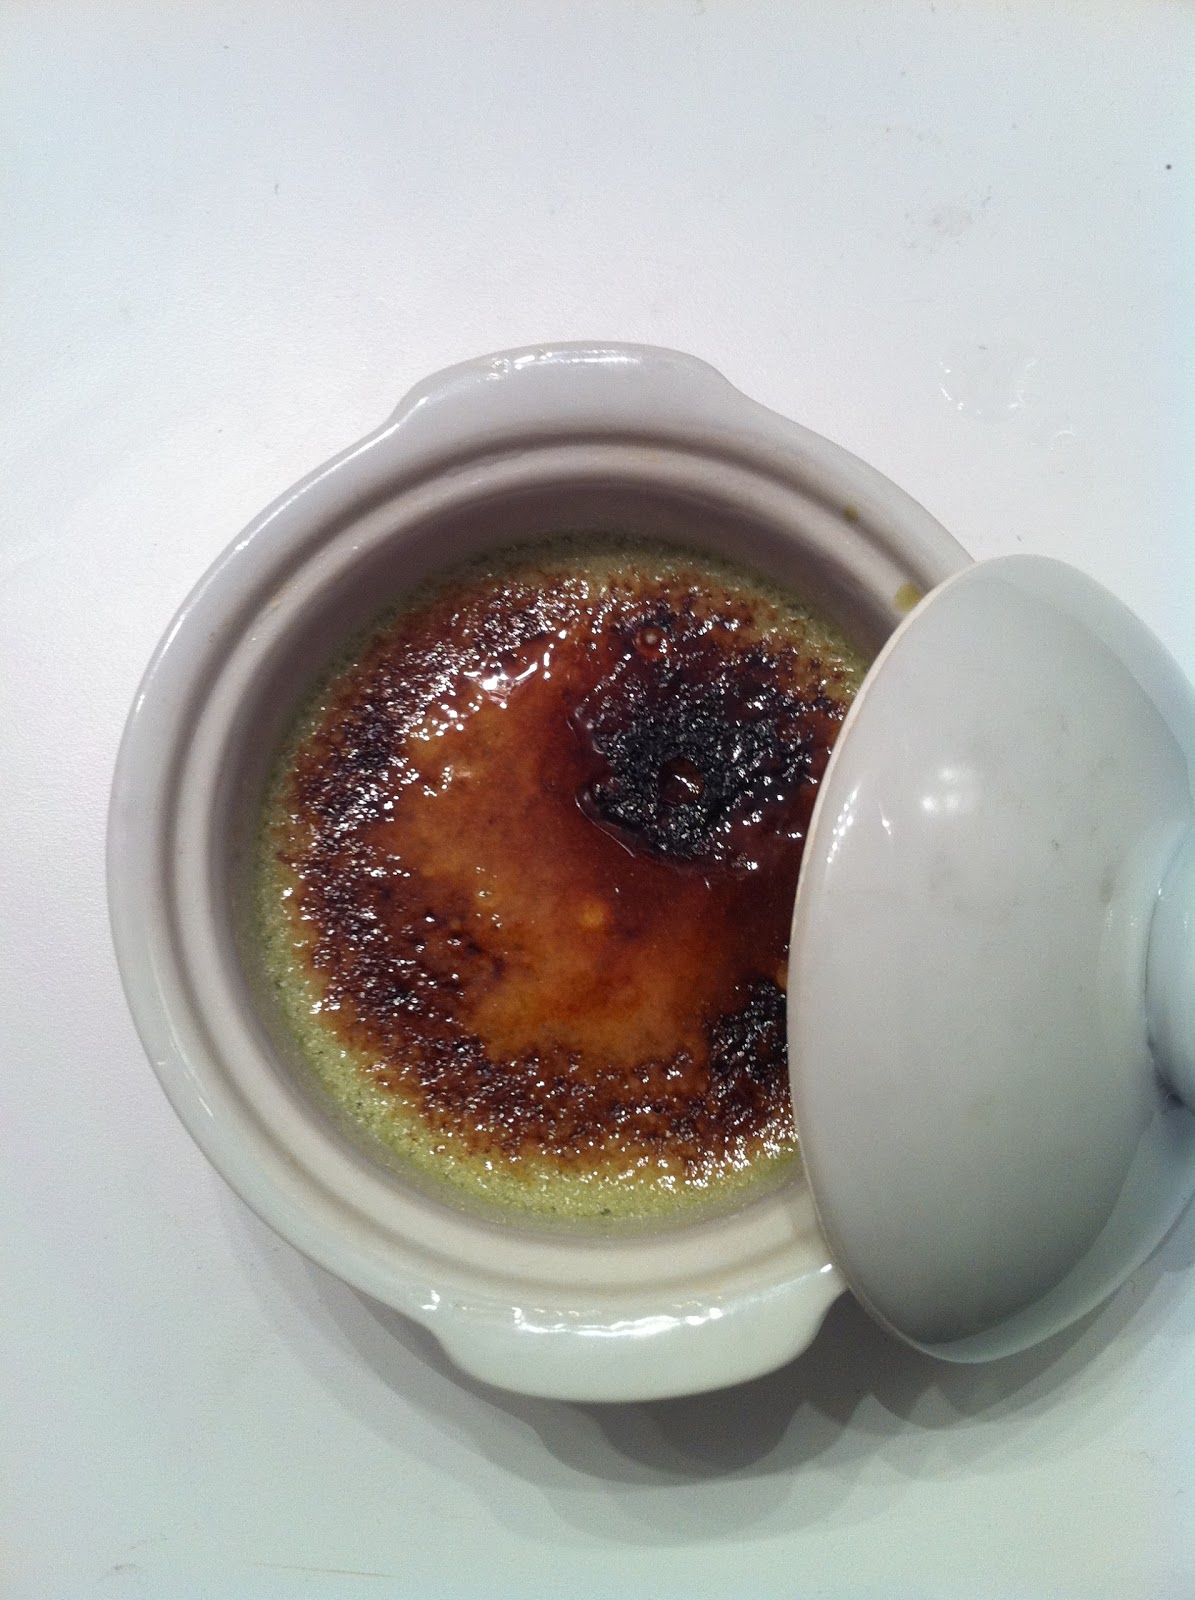
Macha and smashed Lavender Creme Brulee


I had left over egg yolks, because I've got it in my head I'm going to make French Macarons.  The other recipe involves 6 egg whites, so rather than to let the yolks go to waste, I figured I'd bust out the kitchen torch and see what happens...


There are a number of different flavors I considered but I decided to twist it around and use macha (green tea powder) AND crushed lavender.  (In the past, I've also used thai tea, or vanilla beans or almond extract - all delicious options!)


So for this batch, stuff you'll need:


  • 2 cups heavy cream
  • 6 large egg yolks
  • 1/2 cup sugar, plus more for topping
  • 1 heaping Tablespoon of macha powder
  • Roughly quarter cup of lavender flowers (crush them with a mortar and pestal to release the flavor)
Preheat oven to 350 degrees, and put on a pot of water for the bain Marie.

In a saucepan, heat the cream over medium heat, add lavender flowers and macha powder.  Don't let the cream boil - you want it to get warm enough that you can smell the lavender and the macha powder can be incorporated (it'll just float on top of cold cream).  About 5 min.

In a separate bowl, whisk egg yolks and sugar together until well blended - yolks without the whites won't gain volume so just make sure everything is well mixed.

Strain the cream to remove the buds from the lavender.  Slowly pour about a quarter cup of the warm cream into the egg mixture, while stirring - this process is calling tempering, and it allows you to mix the egg with the warm cream without scrambling the yolks!  

Once the yolks are tempered, you can whisk them back into the remaining cream mixture.  Now, I cheated a little bit here - the color wasn't what I wanted it to be, so I added just a touch of green food color - totally unnecessary step but I was going for a more distinguished green color.  So sue me.

You'll notice in the photos, I didn't use real ramekins - actually I found these cute little custard cups in SF Chinatown about a billion years ago, and I use these instead whenever I need ramekins.  They're cute and the come with matching lids...  Ramekins would be ideal, but any single serving oven save ceramic bowl should do the trick.

In a baking pan with high sides, place a dish cloth - this is going to help stabilize the ramekins when you bake. Place about six ramekins in the dish, and divide the creme brulee mix among them.  Fill the baking pan with boiling water so that it comes up about half way up the sides of the ramekins - if your oven has shelves that slide out, you may want to do it over there rather than trying to move a pan full of boiling water.  Safety first and all that!


Bake at 350 degrees for about 30 min, or until the edges set and the middle is still jiggly.  Take them out of the oven and let them cool a bit then cover place in the fridge to cool even more.


Before serving, pour a bit of sugar onto the surface of the custard - tilt the dish around to coat the top.  


Using a kitchen torch, melt the sugar to create that crunchy crust which is the primary reason to eat creme brulee in the first place. The kitchen torch might take some practice, I pretty consistently get darker sugar than I intend to, although I rather like the taste.  Let it cool for a moment to harden and dig in!
 

Enjoy!!

Monday, June 28, 2010

Schmancy looking super simple cream puffs

I love these things - they're eggy and rich and light and fluffy all at once - similar to pop-overs which I fully intend to try sometime very soon...

The shells are awesome, you can fill them with all manner of things, I'm going to put a huge scoop of coconut ice cream in them tomorrow for my friend Sophie at work.  She's skinny.  I'm trying to fix that.  Against her will maybe...

Anyhow malicious intent aside, you can fill these with all manner of things - whipped cream and sliced fruit for example, custard if you're feeling fancy, whipped cream for a light treat, ice cream for a cold treat, etc.

To make the puff shells;

Oven to 400 degrees

1 cup of water
1/2 cup of butter (4 oz)
1 cup of flour
about 1/4 tsp. of salt (I use a smidge less.  Dr.'s orders.)
4 large eggs

combine the flour and salt and set aside

in a fair sized pot boil the water, add the butter and melt it down completely, turn the heat down to medium
Add all the flour at once and stir until fully incorporated, and the dough comes away from the sides of the pot - it will still be a little sticky but it should come off the sides relatively cleanly.

Now you're going to start adding the eggs - one at a time.  Upon adding each egg, you'll find the dough gets a little gloopy - keep blending until the dough is smooth again, then repeat one egg at a time until all four are incorporated.  The dough will start to look like this;

Now spoon the dough onto a lightly greased cookie sheet (or a silpat if you are like me and never want to scrape caramelized anything off your bakeware).  I find that this recipe makes about 12 large puffs, you could certainly make them smaller, just keep in mind that they expand when they bake so you need to leave space between them.

Now pop them in the oven - they'll puff and turn golden brown and crisp on the outside in about 15 to 20 min - individual ovens vary so keep an eye on them.  Try to avoid opening the oven though, the puffs can deflate if the oven temp changes too much - peek thru the window on the oven to check and see if they're done;


When they're done, pull them out of the oven and let them cool - now you can either enjoy them just like this - slice them in half stuff them with your favorite filling!

If you want to show off a little you can dip them in chocolate as well.  Melt a bowl of chocolae in the microwave, and gently dip and twist the top of the puff into the melted chocolate.  I dipped about half of them in coconut;


The shells themselves aren't sweet, so you could in theory make a savory puff from these as well - perhaps a filling of salmon with a touch of hollandaise sauce, or a nice tuna salad with celery for texture?
Use your imagination!!

Tuesday, June 1, 2010

JG's Pears

Photo by Rick Bruner

One of my best friends Jeannette asked me to post this one.  These "poached" pears look deceptively difficult but are really easy to make.  I dipped these in dark chocolate, and served them with a chunky spiced cranberry sauce, with a pizzelle cookie on the side (cause they're pretty!)

In retrospect, I might have dipped the cookie in chocolate rather than the pear as that was more challenging than it needed to be, but either way it's a nice dessert warm or cold.

For the pears;
Bosc pears are my favorite because of the shape, color and flavor but you could substitute red pears as well
one and a half bottles of white wine, I suggest something like a Pouilly Fuse or a sweet Chardonnay
Cloves - whole, around a tablespoon give or take depending on your fondness for that flavor
Sugar - about a cup and a half and a second measure of about a cup
Vanilla extract

For the cranberry sauce;
One to two bags of whole fresh cranberries
Two large oranges - you're going to need both the skin and the flesh of at least one
one cup of sugar (give or take)
water - about 2 - 3 cups per bag
Dried chili powder if you want to add a little kick

Get the pears started first.  Peel and core the pears - if you found some with stems, then leave the stems in tact - don't worry about getting it perfect, part of the home made appeal are the variations you'll see in the final presentation.

In a large pot, combine the wine, cloves and the first cup of sugar over medium heat - bring to a slight simmer and dissolve the sugar.  Add the pears - they'll float but if possible arrange them so that the bulb of the fruit is submerged.  You'll probably have to move them around while they cook.

Once the pears are in, I like to bring the whole thing to a rolling boil once, then bring the heat down to low/medium- ish, cover the pot and let it simmer taking care not to let it boil again, for 30 to 45 min.

Now, you could zest the orange but I like the texture of slivers so carefully slice the orange skin off of at least one if not both oranges - leaving the white part or the pith behind.  Slice the orange skin into slivers and set aside.

Remove the pith and membrane from the orange, and cut up the flesh to chunks and set aside.  Squeeze the juice out of the second orange and set aside (you can use the same dish as the cut up orange).

In a separate pot, combine cranberries, oranges, orange juice and skin, sugar.  Add water till the top layer of cranberries is almost but not completely covered.  Over low heat, stew the berries, with a lid on the pot stirring occasionally - you'll start to notice that the cranberries 'burst, let them - but don't make an effort to smash them, part of the pleasure if the chunkiness of the sauce.  Stir in the chili powder if you want to add a little kick.  Set aside - refrigerate if you're going to serve the dessert chilled.

Give the pears a poke with a fork - you're looking for "al dente" here - soft enough to get the fork in, firm enough to keep their shape. Better to err on the side of firm here.  When you like the texture, turn off the heat and fish the pears out of the liquid.  If you have a rack - like a cooling rack, place the pears on it to drain a bit, if not set them aside on top of a stack of paper towels.  They need to be a little drier to dip and hold the chocolate.

Now tend to the liquid in the pot - give it a taste, do you like the level of sweetness?  Do you need to add more sugar? Turn the heat on to the low side of medium, and bring it to a simmer.  Slowly add the remaining sugar stirring as you go along until the liquid becomes syrupy.  Add a couple of drops of vanilla extract here (only if you want to)  Set aside.

In a microwave proof bowl large enough to dip the pears in, melt the chocolate  - yes I know, it's so much cooler to do it in a double boiler but we're trying to keep it simple here.  If you want to do the extra dishes, have at it.  Otherwise back to the microwave.  I find microwaving in 30 and 60 second intervals with a good stir in between results in the smoothest melt.

Now, one at a time take a pear, dry it lightly in a clean paper towel (just pat it, don't rub!) and holding the stem, dip it in the chocolate.  This is going to make a huge mess unless you're particularly adept at handling chocolate.  Personally I'm still trying to figure out how I got chocolate on my knee.  a tidier option would be to dip the cookie, but where's the fun in that?

Set the dipped pears on a cookie sheet lined with a silpat or wax paper or parchment, and when you've dipped them all, move the tray to the fridge to get the chocolate to harden.  Now if you're like me and in a NY apartment this takes some maneuvering.  Go ahead.  We'll wait.  You have a choice here - either let the entire dish cool through to serve dessert cold, or pull it out of the fridge the second the chocolate sets.

To serve;
Place a spoonful of the chunky cranberry sauce on a plate making a little pile, put a pear down in the center and let the cranberry sauce help to hold it up. Drizzle a little bit of the syrup on the pear, add a cookie - and poof!  It looks way fancier than it really is.

Monday, May 31, 2010

Fluffy things (Bread Pudding, title courtesy of Pam)


This is where it started- I made these for a dinner party and found myself thinking they were cute and deserved to have a photo!  So I snapped a picture and here you are.  Like everything else I cook I encourage you to be brave and add ingredients that you like - for example, this would be awesome with a healthy dose of orange liquor in the mix, or coconut rum  perhaps?


Things you need;
Ginormous mixing bowl, muffin tin (s), cookie sheet, big spoon, and a whisk, bread knife (if you're like me and prefer the bread chunks to be uniform)

Loaf of brioche
couple cups of cream or whole milk (3 - 4 ish depending on how much bread you have - remember it's easier to add more than to take away some)
sugar (about a half cup - again easier to add than to take away)
splash of vanilla
cinnamon (teaspoon or so depending on your affinity for cinnamon)


If adding rum or orange liquor, make sure to take away the same amount of milk - the liquor should replace the milk.

Tear or cube the bread the night before, spread it on a cookie sheet or aluminum foil and let it sit in a cold over over night to dry a bit

Heat your oven to 325 degrees

In your ginormous bowl, whisk your eggs. Mix in the milk, sugar, vanilla and cinnamon. Add bread and stir while the bread absorbs the liquid. The bread should be saturated, not soaking to where it falls apart.

Divide the mix into several muffin tins, and bake until they're crisp and golden (about 20-25 min, depends on your oven.) till they're just crisp and golden at the edges.

alternate options;
instead of milk or cream use eggnog - reduce the sugar and cinnamon if you do and you can add lavender and or lemon grass for a fragrant little twist

Serve with a scoop of ice cream and a dollop of chocolate syrup!