Showing posts with label Low Carb. Show all posts

Friday, February 18, 2011

Crispy Roasted Kale Chips


A couple of years ago, my brother Steve and his then girlfriend (now wife) Masumi took (read: kicking and screaming - me, not Mom) Mom and I to a macrobiotic cafe in the East Bay.  I realize it's supposed to be healthy and good for your body but when confronted (that's right confronted) with a plate full of the parts of plants I typically cut off and toss, I was convinced I was either being punk'ed or punished.

Among the foliage they were trying to pass off as my lunch was a ginormous heap of Kale.  I was NOT on board for this.  While my family giggled and I contemplated life as an orphan/only child, we tucked in to graze.  Mentally I was trying to recall where the closest drive thru McDonald's was located - I had every intention of getting even.

Fast forward a couple of decades and I still hadn't even considered allowing kale to have a place in my shopping cart.  Then I read about kale chips.  I come from a culture that eats seaweed, I felt like I should reconsider my position on this offending vegetable - what better way than to make it into chips?  An epiphany was happening!

Kale chips are crisp, delicate and can be seasoned a number of ways - I'm going to break down the garlic and salt version, but scroll to the end for additional ideas.  Also you'll find there are a number of varieties of kale, they basically cook the same, so try any one or grab a couple of different varieties and mix it up!  If your kids are adverse to kale (like I was) getting them engaged to help could be a good way to introduce this vegetable to them!

Stuff you'll need:

  • Kale - one bunch shrinks down to what looks like a single serving to me so you might want to consider several bunches if you're going to share.  
  • Sea salt 
  • Olive oil
  • Garlic - finely minced
  • Baking pan
  • Silpat or parchment (not absolutely necessary but makes clean up a breeze)


Preheat your oven to 350

The hardest part of this treat is cleaning the kale - the woody stems of the leaves needs to be cut off - they don't crisp up, and personally I find the contrast of crispy leaves with not crispy stems to be off putting.  Then again, I DID admit being new to this kale appreciation thing...

You don't need to fuss about and cut the whole stem out, but I'd get rid of the widest parts - the easy way is to fold the leaf in half the way it naturally folds with the stem on one side as the fold.  Use a sharp knife (be careful!) and slice along the edge of the stem, taking the whole thing off in one chop.  You can tear the leaves into pieces about the size of a business card at this point if you like - just keep in mind they shrink when they cook so no need to make them bite size.

Wash the kale, and make sure it's as dry as possible (I use a salad spinner) - water on the leaves will lead to steamed kale rather than crisp kale.
Toss with olive oil and salt to lightly coat, and lay out in a single layer on baking pan.
Sprinkle with minced garlic and pop the entire tray in the oven.

Cooking times vary depending on who you ask - anywhere from 8 min to 15 min, your oven and the way it performs will be the greatest variable.  Keep your eye on the kale, you're looking for a rich dark green color, and for the leaves to flatten out a bit and become crisp.  My chips took about 12 minutes, eating them took about 4.


For a little variety, substitute various oils and/or add dry seasonings.  Some suggestions:

  • Sesame oil soy sauce and a touch of wasabi powder for one Asian variation
  • Sesame oil and 5 spice powder for another Asian variation
  • Crushed chili flakes for a spicy kick
  • Sprinkle dry salad dressing mix 
  • Sprinkle finished chips with Parmesan before transferring to a plate to serve
  • Get creative!  


Enjoy!


Sunday, November 14, 2010

Simmered Daikon


My mom used to make this dish - but at the time I wasn't a fan of daikon so I really didn't eat it.  Naturally mom knew best and now I find myself making this dish - although it's really mostly out of curiosity about technique and the amazing flavor of the broth, more so than sudden love for the flavor of this particular vegetable.

Bonus - it's easy to make this dish vegan if need be, by substituting a soy broth for the dashi broth (dashi involves steeping dried fish in the soup base, so it's really just a matter of how strict you need to be.)

Stuff you'll need:

  • Dashi stock - enough to cover the daikon slices (I used about 4-5 cups, click the link for the recipe)
  • Soy sauce to taste - a couple of table spoons for the non-vegan version, about 1/4 to 1/2 cup for the vegan version
  • Mirin - 2 - 3 table spoons
  • Dried Shitake - again use dried here the fresh ones don't have the flavor or aroma
  • Daikon - Japanese radish, looks like a massive white carrot on steroids

Peel the thin outer skin from the daikon, and slice into fat slices - I find just under an inch works for me.  Using a pair of chopsticks for a guide, slice part way thru the slice creating an 'X' on the surface.  This is both decorative and practical as it helps the simmering sauce penetrate the daikon slices.


Put the daikon and the dried mushrooms in a pot with the dashi stock add soy sauce and mirin to taste (I prefer to go light on the soy sauce as it results in more delicate flavors in the end) cover the pot, and bring to a boil, move the lid aside a bit to let steam escape, turn the heat down and simmer until the daikon are tender and start to become ever so slightly translucent.

The vegan substitute for dashi stock would be more soy sauce, and mirin - also adding a piece of thick konbu to the pot - the flavor will be similar to what you would get if you use dashi, but without the fish stock flavor.

Enjoy!!

Saturday, October 23, 2010

Five-spice Short Ribs with smashed garlic

Photo by Amy Fletcher for information go to http://www.aefletcher.com/

I love short ribs.  The tender fatty bits of slow braised meat that fall apart in their buttery goodness - what's not to love???  I've also discovered, I have a fondness for 5 spice powder and garlic and my slow cooker and red wine.  So I decided to experiment last night, and the results are what you see above (good thing there's a photo because I don't remember chewing....)

Beef short ribs go well with a few other flavors - onions, garlic and red wine if you're doing a western style preparation, 5 spice powder, sesame oil, soy sauce, garlic and mirin if you're doing an Asian style preparation.  I decided to combine the two and see how it came out - delicious that's how!!  I think this would only have been improved if I'd done a stove top or oven braising but I have DVR programming I wanted to catch up on so crock pot it was.

You're going to need;

  • Short ribs - I've used boneless as well as slabs with bone - either works (short ribs shrink like crazy so eye ball two portions size raw for one portion cooked.)
  • Onion - mine were regular yellow onions, but I bet one of the sweeter varieties would have been good.  I used half - you can use the whole thing if you're a big fan of onions
  • Garlic - I tend to use too much, like 8 cloves, I suggest somewhere around 4
  • Soy sauce - half a cup or so
  • Sesame oil - 1 - TBSp
  • Beef Broth 2 to 3 cups
  • Splash of rice vinegar (or apple cider vinegar)
  • Mirin - about 3 table spoons (more or less to taste)
  • Red wine - I used an inexpensive Cabernet 
  • 5 spice powder - about 3 TBSP. 

I discovered that 5 spice powder varies from one place to another - mine personally has 6 spices in it for crying out loud!  However, most of the time you'll find it's a combination of cinnamon, clove, anise, licorice root and ginger in varying portions.  Mine happens to have fennel in it as well.  It's a wonderfully aromatic blend so I wouldn't spend too much time worried about it.

Dice the onions into substantial chunks - no need for a super fine dice here, one inch chunks ought to do - set aside.  Smash the garlic using the side of a chef's knife or cleaver - smashing the cloves make it easy to pull the papery skin off.  Cut the short ribs into uniform pieces (figure one or two chunks per serving).

In the slow cooker/crock pot, combine 5 spice powder, beef broth, soy sauce, red wine, mirin, vinegar, and sesame oil.  I find that pouring the oil in last makes it easier to incorporate the 5 spice powder which tends to stubbornly float on top.  Stir to mix, and give it a little taste - it might seem a little on the salty side which is fine, but you want to make sure the cooking liquid tastes good from here - I found I added a bit of red wine to make the flavor a bit more robust here.  Add the onions and smashed garlic, and the rib meat.

Turn on the cooker and walk away - my slow cooker has three settings, low high and warm - I set it on high for about 3 hours (it's called a slow cooker for a reason).  At about two hours take a peek - you want to make sure the onions are taking on a translucent look to them - give everything a good stir and - if you're like me - now's a good time to poke it.  The rib meat needs to fall apart with a fork alone before it's ready.


Once the meat is falling apart soft, you're ready to serve - I found mine took about 3 and a half hours total, times will vary based on your cooker.

I'd suggest topping it with something green - thinly sliced scallions or chives - cilantro would also probably be good although not sure on that one as I'm one of those people that thinks it tastes a bit like soap.  This would be great served on top of a steaming hot bowl of ramen soup as well for those not carb conscious!!

As a treat thick slices of daikon added in the last hour would also be delicious, as would chunks of carrots or potatos (though less so for the last two in my opinion).

If you don't have a slow cooker, don't despair, you can make this on a stove top or in the oven;

I suggest you use a large pot like a cast iron dutch oven.  Doesn't have to be cast iron, but I like the way those pots disperse heat.  Make sure you have a lid for the pot and if you're putting the pot in the oven, make sure it's oven proof (no plastic handles etc.).

In Oven directions:
Set your oven to about 350, and for added flavor, pour a splash of oil in the pot first, drop in the garlic and do a quick sear of the short ribs in the pot before you add the braising liquid.  Pour in enough liquid to cover the ribs half way (not all the way), cover and pop the whole thing into the oven and let it cook checking periodically to see if you need to add liquid as it cooks off. You want to let it cook until the meat is falling away from the bone.

Stove top directions;
Pour a splash of oil in the pot first, drop in the garlic and do a quick sear of the short ribs in the pot before you add the braising liquid.  Add enough liquid to cover the ribs half way, and bring to a boil.  Turn the heat down to the low end of medium and let it simmer slow and low till the meat is fall off the bone tender.
(if you're using a gas oven eye ball it, it's more accurate than the dials, if you're using electric you'll need to pay a little more attention and possibly adjust the heat to get a simmer)


Enjoy!

Wednesday, September 29, 2010

Dashi to die for


The weather is getting cooler (finally!) which in my mind, makes it soup season.  All kinds of soup!  I'm starting this season off with soups based on the ingredients my mom had around the house when I was a kid - Japanese influences, tasty bits.  Lots of things like tofu and miso, petals of chicken and fish.

The bases of many Japanese soups and broths is dashi - the seasoned fish and kelp stock that is the corner stone of many kinds of soup.  Without good dashi, you don't get good soup - the nice thing is, the definition of good dashi is entirely up to the person who's holding the spoon.  That is to say, my mom might say I'm doing this wrong, but it's been damn tasty.  For example, I use shiitake and I like to make the flavors a little stronger in my batches, as I find it lends well to freezing and reheating.

So, with that in mind, I'll lay out the basic instructions for simple dashi - feel free to change the recipe to your taste.  For example David Chang of Momofuku fame makes a bacon variety that I'm dying to try making!  I'll let you know when I get around to it.  In the meantime I've made a couple dozen batches using the guidelines below and find it gets better every time.

The ingredients:
  • Konbu - or Kelp - you can pick this up in most Asian food markets.  It looks something like this
  • Bonito flakes - dried bonito (or Sarda, a type of mackerel), shaved down into flakes, sometimes mixed with dried shaved sardine flakes as well
  • Mirin (Japanese cooking wine) - mine looks like this but I haven't found much difference between brands
  • Dried shiitake mushrooms - re-hydrated in water with a splash of soy sauce and a splash of mirin - dried shiitake have a richer flavor than fresh, this would be one instance where I would say don't bother with the fresh version.  I should mention - shiitake mushrooms have a spectacularly earthy rich smell and flavor to them.  If you're one of those people that doesn't like things like truffles and mushrooms, skip this.  Otherwise let them soak for a couple of hours until they're soft, and save the soaking liquid.

  • Soy Sauce - I'm going to take this opportunity to get on a little soap box about soy sauce.  There are a ton of brands out there that aren't real soy sauce - they taste like soy sauce but they involve things like caramel color, even sugar sometimes but no soy beans.  Read. The. Label.  While real soy sauce comes in several varieties every variety should start with soy beans.  If it doesn't say soy beans put it back on the shelf.  Good ingredients make good food so I think it's worth paying attenuation.  
  • Water is the last thing - I like to make a big batch and freeze the dashi so I can use it over the next couple of days, so I'd start with around 6 cups of water. 
Put the water into pot large - I use a three quart pot.  You want to make sure there's enough space so the broth won't boil over.  Slip one sheet of konbu into the water - don't worry about washing it or anything, just straight out of the package, into the water.  Bring the water to a simmer and let the konbu steep until it's tender enough to cut into with a fingernail or edge of a spoon.  Then turn the water off, and let it sit for another 15 min or so.  The water should have developed a briny-kelp fragrance and a slight olive tinge.  Many recipes call for taking the konbu out much earlier but I rather like the flavor so I let it steep.


Next add the fish flakes - and be generous with them!  I use 1 or 2 generous handfuls, or roughly two cups lightly packed.  The water should be hot but not necessarily boiling - if need be, turn the heat on medium to low and bring the liquid to a simmer again.  Put a lid on the pot and let it steep as well, the flakes will sink to the bottom which is your signal to move on to the next step.


Strain the flakes out, using a sieve or cheesecloth.  I use a conical strainer sometimes called a chinois (although I'm not certain mine is actually a chinois as it's not mesh)  Season the resulting broth with splashes of mirin and soy sauce to taste - I tend to leave my dashi a little on the less-seasoned side, to accommodate the various flavors that come from adding it to different recipes like miso soup.


The next step is optional, I love the taste of shiitake mushrooms so I think of it as part of the base I pour the soaking liquid from the mushrooms into the broth, then slice up the shiitake and drop them in as well.  That gives me a head start the next time I want to use the broth, but it also means I have shiitake in anything I make with the broth. That makes me happy :)

I pour the dashi into one cup lidded containers to freeze them for later use (there were actually two more, but I couldn't help myself...they never had a chance.)


Now you have dashi!  Dashi can be used as a base for noodle soup, or hearty but delicate soups.  Dashi is also the key ingredient in miso soup - without it miso paste just makes salty water, or as the base for the sauce for tempura and age dashi tofu.

And sometimes, I like to just have a mug of it by itself to warm up on a chilly day.

Enjoy!

Tuesday, August 31, 2010

Chawan Mushi


When I was a kid, my mom would occasionally serve a dish that I loved to look at, loved to dig my spoon into, but didn't actually like to eat.  Fortunately for my mom, I could be convinced to eat foods that were interesting even if I didn't like the taste.  Fortunately for me, my taste buds finally caught up.

This dish is called Chawan Mushi - it's a savory egg custard, typically served with chunks of seafood buried in soft silky custard - the most difficult part is not burning your mouth on it as you inhale it.

That said, I'm pretty sure my mom would say I'm doing it weird, but once I started playing with the custard, I couldn't help tweaking the ingredients.  So here's the tweaked original version, I'm toying with dessert versions - I'll get back to you on that.

It's might seem a little more complicated than it really is, because there are some practical things you need to do to get the texture right, but it's really pretty simple to make.

Prepare a steaming tray/pot, and several heat proof dishes, this recipe yields four servings at about a cup each, but using smaller dishes (ramekins for example) could yield 6 to 8 servings as an appetizer.

The dashi broth is the key here - I specify dashi broth, because you can purchase dashi in powder form to reconstitute with warm water - but you need the volume of the two cups of liquid to make the custard.

You can make a traditional dashi stock using dried bonito flakes and konbu - large pieces of seaweed, which can be found in Japanese grocery stores.  Bring a couple of cups of water to a boil with the konbu, you'll start to notice a heady aroma coming from the pot, then remove the large pieces and set aside.  Add the dried bonito flakes to hot water, letting it steep like tea, then strain.  The resulting clear broth is your dashi.

Alternately you can use dashi powder - I tried both ways myself, and found that a combination of the two (steeping the flakes then adding a little powdered dashi) resulted in the best flavor - the broth should be a little strong as you'll be adding egg to the mixture.  An alternative would be to use chicken stock, or beef or vegetable stock - really any clear broth, boiled down a bit to strengthen the flavor.


Chawan mushi is known for it's earthy flavors, so when making the broth, I like to add the sliced Shitake which lends a nice robust flavor to the broth - if you happen to have Porcini mushroom powder, I'd add that too - yum!  If you add sliced mushrooms, you'll want to strain them out so you can measure the liquid - just run it through a sieve and set aside the mushrooms and stock in separate  dishes.


Make the dashi stock in advance, and set it aside - you can even put it in the fridge to cool, it needs to be cool enough not to scramble the eggs when you mix everything up.  You're aiming for room temperature or near it.
  • 3 large eggs
  • 2 cups dashi (broth style)
  • 2 to 3 small shitake mushrooms, finely sliced
  • 8 prawns (or scallops, or crab stick - I didn't have seafood the first time so I used sliced chicken, soft tofu would probably be redundant, but one of those fried/baked/smoked/grilled tofu steaks is delish!) 
  • Ginko nuts (if you have them)
  • Shiso leaves (a chiffonade works best - fancy word for clever slicing up)
In a small pot, parboil the prawns (or chicken or whatever you're using), I like to add soy sauce to the water for the boil just to season it.  Pull the prawns out of the water and set aside, pour the water into the pot you're going to use to steam the custards (extra step - totally unnecessary but I like to add every bit of flavor I can.).

Crack the eggs into a good sized bowl and blend them - gently - you want to incorporate them thoroughly , without creating bubbles or adding air to them.  Slowly stir in your dashi broth.

In the bottom of the serving/cooking dishes, divide up the prawns, mushrooms from the broth, and ginko nuts - you can get creative adding things here, tomorrow I'm thinking of trying a version with bacon or pork belly...


Divide the egg mixture evenly into each dish, and cover the top with plastic wrap.  Set your steamer on medium heat, and place your dishes in the steamer.

Now walk away - it'll take 15 to 20 min for a one cup dish of custard to cook through,  slightly less for smaller dishes.  You can tell the custard is cooked when you tap the edges of the dish and the liquid no longer runs.

Garnish it with a bit of Shiso chiffonade - take several clean dry shiso leaves (you can get them in Japanese grocery stores) stack them up, and roll them, then slice them thinly - it'll result in ribbons of shiso (also a great technique to have in your pocket for basil and other leafy herbs).  Shiso looks like this;


Chiffonade looks like this;


You can serve these hot or cooled, personally I can't wait long enough for them to cool and my mouth is currently all kinds of burnt.

I'm fussing with a dessert version now -since you can effectively make these low carb and low sugar, I'm thinking some vanilla maybe cinnamon.... like a low carb creme brulee!  Anyhow I'll get back on this one

Monday, August 23, 2010

Yep, I'm a carnivore.


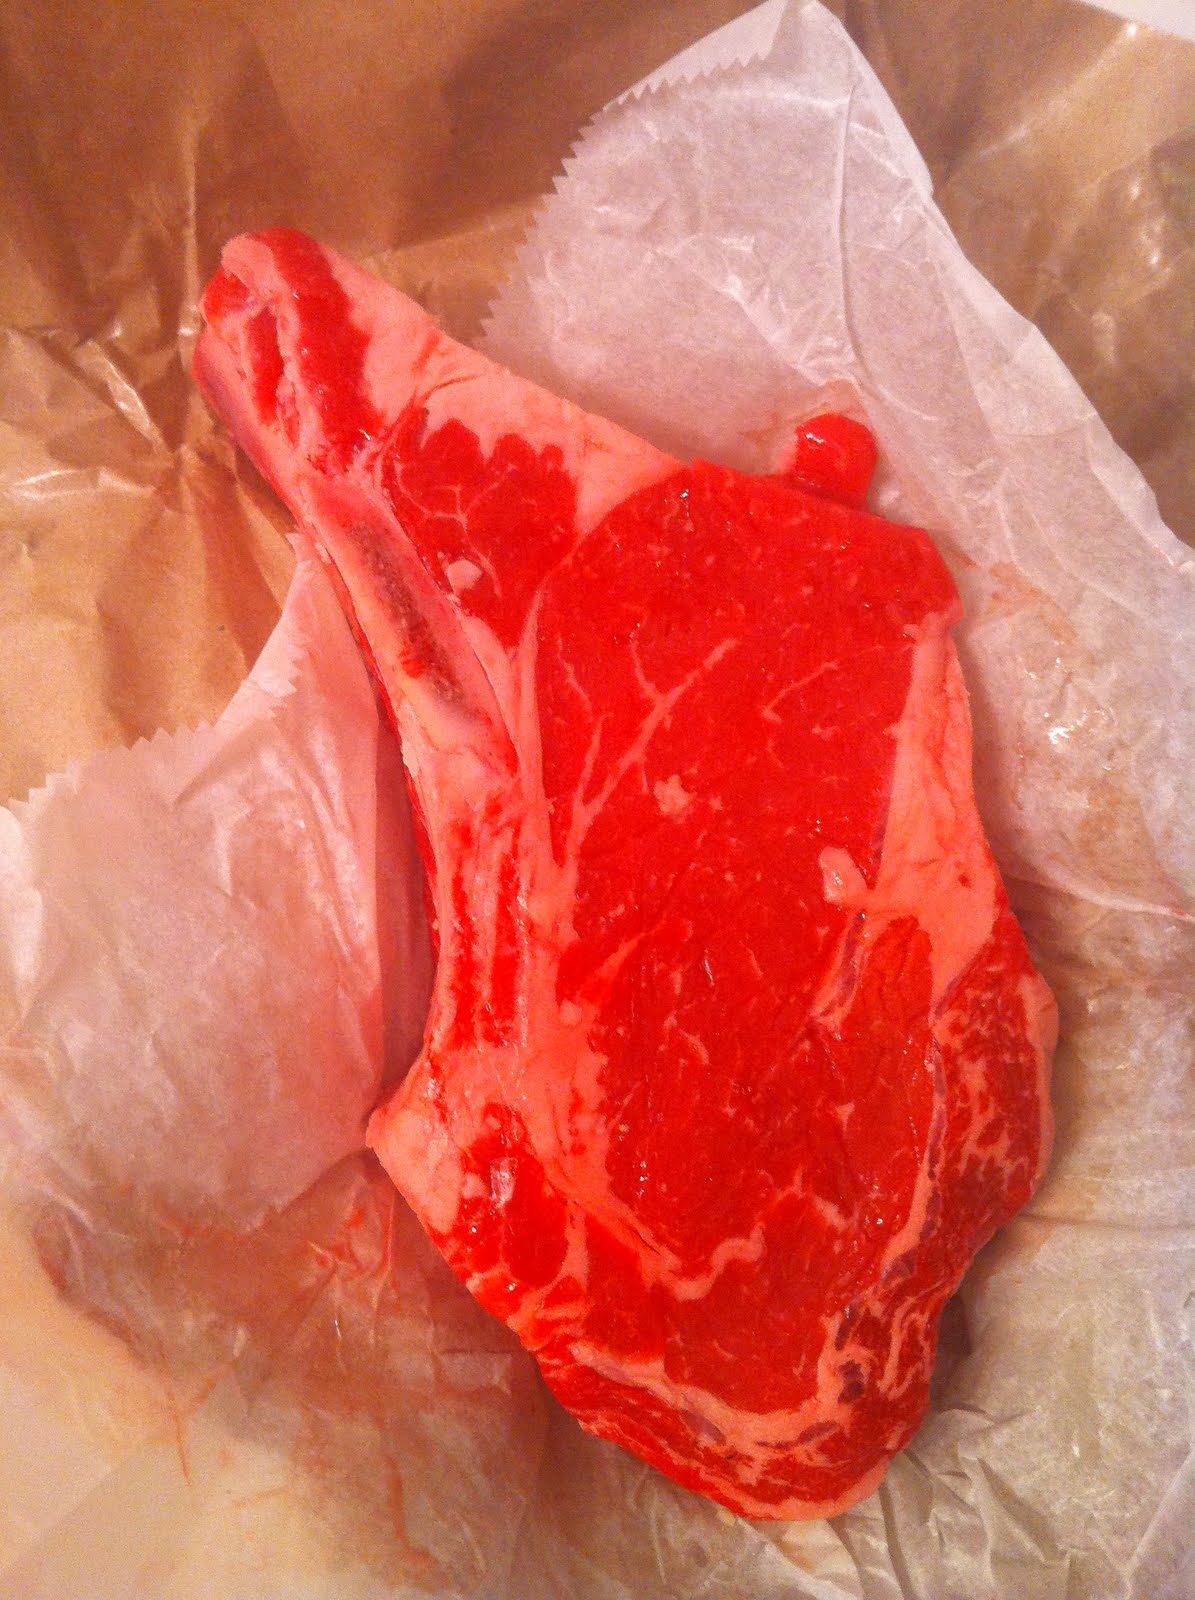
Yesterday, I wandered into Whole Paycheck - that is Whole Foods, on Union Square, in search of some motivation for dinner.  Something I'd want to eat this week.  And I found it- they had these Rib Eye SLABS, they were passing off as steak in the butcher department.  I mean face-sized slabs of aged beef with beautiful marbling.... Really.  look;

If you're a carnivore like me, how are you supposed to resist this?  What you can't see in this photo, is that it's about 2 inches thick - cut funny, admittedly - I mean did we have to go diagonally across nearly three ribs?  But who cares??!!  This is a steak for steak eaters...

I dunno about you, but I've f'ed up steak before.  No really - I've yanked it off the stove to find there's no pink on the inside, or found it to be charred outside and still moving inside - I've had a challenge finding the perfect medium rare.... but tonight - I did it!!  And I thought I should share HOW it was done, in hopes that I can replicate it...so here goes

Oven to 450 - use a cast iron pan for this - really, there is no substitute for this at all - and place the pan in the oven to warm while you prep.
  • One big fat steak.  Big, and fat - find a proper butcher, there IS one in your area, you just have to find them.  Grocery store cuts of meat are going to cook too fast and won't yield the kind of results you want for this no way no how...
  • Bulb of garlic - this will come out buttery and soft, you can eat it, smear it on bread, or toss it if you're not a fan of garlic, but it adds flavor to the steak
  • Shallot - one big fat whole one
  • Butter - I used fresh home made butter, which lent a creamy taste that was way more than I expected and may have lent to inhaling of the steak
  • Olive oil
  • Salt and pepper to taste

To prep the steak, take it out of the fridge and set it out for about 30 min to bring it to room temp.  Sprinkle both sides with salt and pepper and let it rest.

Peel garlic and shallots - my favorite technique for peeling garlic involves smashing cloves with the flat side of a knife - it magically loosens the paper thin skins and allows it to release the flavor without tedious slicing and mincing.  Slice the peeled shallots in half - long or short way, no matter, they're getting roasted too!

Set the garlic and shallots aside and get ready to cook - pull the pan out of the oven (leave the oven on) and place it on the stove top on high heat.  Pour in a splash of olive oil and a chunk of butter - I never said this would be a low calorie dish...let the oils and fats heat up real good.

Place your steak in the hot pan, and don't touch it.  Seriously leave it alone for 2 - 3 min - no peeking nothing.  Grab a pair of tongs and flip it over and do the same again on the other side - again 2 - 3 min.  Sprinkle the shallots and garlic across the entire pan, add another chunk of butter and slide the whole thing into the oven.

Walk away - for about 6 to 8 min.  You'll hear crackling, and sizzling, and you'll smell the garlic and you're going to leave it alone.  Remember, shorter times for thinner cuts, mine was a little over 2 inches, and it went for 7 min.  This is the result;

Pleasantly pink, still a little cool in the center, nice caramelizing on the outside....if you're a steak eater, you're drooling now. I ate this with a side of lightly sautéed spinach that I tossed with the roast garlic from the steak pan.  It pairs nicely with a robust salad as well - something with hearty greens like romaine and a nice red - I'm working my way through a bottle of lambrusco at the moment...

Enjoy!!

Stove top grilled shrimp


I have to preface this by saying - normally, I don't advocate purchasing specialty cookware.  I know I mentioned the slow cooker in a previous post, but that's because it was on sale for $19.95 - that was more of a favor than a "you-gotta-have-one-of-these."

But this little fish griller from the Japanese market - I think of this as more of a kitchen necessity, source of many of my favorite dishes growing up.    (they're called yaki ami)

My mom used to use this thing to grill fish, roast mochi, cook enoki mushrooms... all manner of yummy right on top of the stove.  Also works great for roasting peppers, tomatos and veggies.  I picked this one up at Sunrise Mart in the East Village, but I'm sure this or something just like it can be found in many Asian markets. It should run somewhere in the neighborhood of 15 to 25 dollars, some even have legs that will raise it up higher from the flame.

Older versions were a bit harder to keep clean and necessitated replacement on a fairly regular basis, (I think we had one early on that had an asbestos plate on the bottom...) but this version disassembles relatively easily (OK there are parts that maybe shouldn't have come off, but they did, and they snapped back on reasonably easily so I'm going with it.)

The first thing I cooked on this were a couple of massive shrimp (the one's above are parked on a full size dinner plate with a one inch border) I found at Grand Central Market, if cooking smaller versions, consider putting them on skewers which have been soaked in water.  This is a great way to bring the taste of outdoor open flame cooking indoors (to your tiny NYC apartment).

Make sure your stove top is clean and free of grease - I realize this sounds obvious but worth mentioning as a grease fire could really put a damper on dinner.


  • 2 - 3 massive shrimp/prawns - I found these Gulf of Mexico monsters at the Grand Central Market, each one was a good 8 inches from end to end, not including the antennae
  • 1 dollop of  Miso paste (roughly one tbsp per shrimp) type of miso is completely a matter of taste - I like aka miso (red miso) or awase miso (white and red combined) but really just a matter of taste.
  • 1/4 cup of water
  • Sesame oil


In a small bowl, mix the miso paste, with the water - adding the water in small measures until you  get an emulsified paste similar in texture to hand lotion.  Slightly lumpy hand lotion...

Dip the shrimp - shells and heads on - into the paste.  It's important to leave the shells and head on or you'll find the shrimp become inedible due to the saltiness of the miso - I don't care HOW much you like salt, it's too salty. Coat thoroughly, sprinkle with sesame oil and set in the refrigerator for 20 to 30 min to marinate.

Dip a paper towel into sesame oil and lightly coat the grill top - be careful not to get oil on the pan closest to the flame, or you'll have smoked shrimp and not in a good way.  Preheat grill over high for 3 to 4 min, then turn heat down to medium/ medium high.

Remove the shrimp from the refrigerator and place directly on to the grill - depending on the size of the shrimp, they should take about 2 to 4 min on each side.  Don't be alarmed if the shells start to char, it only adds to the flavor.  Try not to over cook then shrimp, as most varieties can get rubbery if over cooked.

Serve whole with mixed greens topped with carrot miso dressing (recipe coming soon)

Tuesday, August 10, 2010

Miso Mussels!


I used to hate mussels.  Really - couldn't stand eating them, hated the occasional gritty one... but I've totally changed my mind!!

There's a dozen ways to do them, this is the way that I like based on the random things I had in my fridge.  I usually keep a tub of miso paste in my fridge, and sesame oil and mirin in the cupboard.

Mussels - most markets around here split them into one or two pound packages, just make sure you have a pot big enough to fit them and cover with a lid.
Leeks - one fat one ought to do it
Splash of Mirin
Splash of Sesame oil
Dollop of miso - more or less to taste, (again Dr.'s orders to watch my sodium intake, so my broth was on the light side) dissolved in whatever liquid you're using to cook the mussels
Water - or vegetable or chicken stock, both of which add more flavor to the final soup, depending on the size of your pot, you'll need a couple of cups

Slice the leeks diagonally into fat slices (around half to 3/4 of an inch). I like to use the whole thing, but many people only use the white and light green parts, tossing the dark green leafy bits.
Wash the mussels - give them a good rinse, pull off any beards still stuck on there, make sure the water runs clear - this ensure you can drink the cooking broth later.  You will NOT be disappointed...

On your stove top, put the mussels in a pot, add the liquefied miso along with the cooking broth and mirin - the liquid doesn't need to cover the mussels, half way is sufficient.
Turn the heat on to high just long enough for the brew to start to boil, then immediately turn down to medium.
allow to simmer until all the mussels are open.

IMPORTANT:  discard any mussels that don't open up - that's a sure sign of old or bad shellfish!

Slow cooker on sale for 19 dollars? Oxtails please!


I went into Macy's thinking I wanted to replace my George Foreman Grill.  Anyone familiar with my cooking obsession knows I'm a big advocate of this thing.  As I was wandering around the heavenly area called the cellar, I stumbled across a find I would never have guessed....a crockpot.  For 19 bucks.

My last crockpot was at least ten dollars more, was way smaller and after years of use lost the handle on the lid and had a brown haze that can't be scrubbed out.  For 19 bucks?  It's time to replace it.

So I brought it home, and let  it sit on the floor for a couple days while I contemplated what to do with it.  It's summer, not exactly crock pot season.  But I love these things because it's really all about being liberal and combining flavors rather than recipes.  

The Flavor Bible, which is a great book that helps me pair seasonings and flavors with food suggests flavors like allspice, anise, bay leaf, garlic, shallots, and thyme to name a few.  You could also take a different route entirely and base the stew on Asian flavors like soy sauce, sesame, ginger and garlic, and mirin (Japanese cooking booze).

So here's my off the cuff version of Ox Tail stew  (I would like to point out here, that I used to have a tremendous aversion to Ox tails.  Always felt like it was too close to the business end of the cow for my taste.  I'm over it - I suggest everyone get over it...);

Oxtails - I used about 3 lbs with the intent to freeze a couple portions (if I can stop taking a bite every time I walk by)
1 can diced tomatoes - because they happen to be sitting on the counter
Beef stock - I happen to have a concentrate in the fridge, with just a spoonful left but any kind of stock is fine
Several cloves of garlic
Peppercorns
Shallots
Various herbs -   I used a mix called Herbs de Provance, added a bit of fennel, some cardamom and a handful of pepper corns.  

If you have temperature options, use high here if you intend to eat that night, low if you're planning on cooking overnight.

Depending on size of your slow cooker, pour in enough liquid to cover the bottom by about half an inch.  You don't want to fill the pot first because you risk over flow once you add other ingredient.  Well unless you like cleaning up messes in which case, have at it.

Add the rest of the ingredients - don't worry about the order, or mixing or blending, just add them evenly across container so everything gets seasoned.

That's it.  You're done.  Just walk away now and let it cook.  Depending on your slow cooker, you should be able to eat the ox tails in as little as four hours.  I let mine cook for 5 hours, then turned the heat down to low and let it go on over night (that's right, ox tails for breakfast! with a poached egg no less - think steak and eggs).

This brew is also a great place to add root vegetables - parsnips for example, whole onions, potatoes, carrots - thing of things that grow underground for this dish, hearty rib sticking veggies! (which I didn't add because they're high in carbs and I'm still being obnoxious about my diet.) Consider adding the veggies in the last hour to two hours to avoid having them dissolve completely in the stew.

Enjoy!


Monday, June 14, 2010

Ginger Orange cheater's ribs


I have to start this post by admitting something.  I cheat.  Bad.  That is to say I am fully aware of the merits of slow roasting ribs until they are falling off the bone.  I have neither the time nor the patience (and it makes my microscopic NY apartment to damned hot) to do it that way.

That said, this is a manageable recipe that you can pull together in time for dinner on a weeknight (ok maybe a late ish dinner but still....)

Fresh ginger, grated - about a table spoon
4 juice oranges squeezed (between one and two cups of juice)
thyme
rosemary
garlic - I like smashed cloves
sage
olive oil
salt and pepper to taste
baby back ribs - about 4 to 6 bones per person 

Oven to 400

In a bowl, grate the ginger - add the orange juice and set aside
rub the ribs with the smashed garlic cloves, then sprinkle with salt and pepper
on a foil wrapped baking pan (I used my lasagne pan this time, but a cookie sheet will do, and foil wrapped so you don't feel like setting yourself on fire later when you're cleaning up), arrange the ribs and sprinkle the fresh herbs liberally about the pan and on the meat.  Toss in a handful of garlic cloves, and drizzle with olive oil.  Take your orange/ginger juice and pour half of it on the ribs coating them nicely.

Pop the whole kit and caboodle in the oven and let it roast at 400 degrees for about 10 min or until the meat starts to brown.  Turn the heat down to 325 (ish), and baste the ribs once with the orange ginger juice.
Leave it alone for about 30 min.

After 30 min has passed, baste the ribs with the remaining orange ginger juice - it'll take about another 30 to 45 min to finish roasting and voila - yummy cheater's ribs!!


Sunday, June 13, 2010

Bacon and Egg salad

I've been into poached eggs lately - can't tell you why.  But I've discovered this is my favorite salad lately.  It's easy to make, although the poaching part takes some practice - the first dozen or so eggs came out either under or over cooked every time...

Slab bacon - I recommend always keeping it around the house - you can get it at places like th Amish grocery   stores in NYC or other grocery stores that have a deli counter, or from Fresh Direct.
Mixed greens - I like the spring mix with frisee  and a bit of baby arugula mixed in.  
Large fresh eggs
White or cider vinegar
Balsamic vinegar
Olive oil
Sea salt (I used black lava salt in this case - hence the black flecks)
Dash of Parmesan

Dice the bacon into big chunks, and cook over medium heat until it gets to your favorite level of crispyness
set it aside, don't drain the pan
In a small sauce pot, bring water to a boil - you want it to be a couple of inches deep 
Add a splash of white or cider vinegar - it helps to keep the egg together during poaching
Crack the egg into a small bowl - it helps to ease the egg into the water, making it easier to retain the shape
Once the water is boiled, turn the heat all the way down but not quite off.  Slide the egg into the water gently.
Let the egg cook between 4 to 7 min - this is the experiment part, it depends entirely on how soft you like the egg.  I find my sweet spot is right about 5 and a half minutes.
Once the egg is cooked, lift it gently out of the water using a slotted spoon.  Set it on a paper napkin to drain.
In the pan where you cooked the bacon, add a bit of olive oil, and the balsamic (red or white) pour that over the greens and toss to mix.  Pop the greens on a plate and sprinkle (liberally!) with the cooked bacon.  Top with a poached egg, and a little pinch of salt right on the egg.
Dig in!!


Friday, June 4, 2010

Super Low Carb Turkey Burgers!


One of my favorite kitchen tools is my George Foreman grill.  now normally I wouldn't advocate anything that is sold late at night in program length commercials, the Foreman grill or a grill like it would be the one exception.  I have the smallest model, which is great for me since I usually only cook for myself.  I can make everything from beef burgers to bacon in it, and there's little if any smoke, and hardly takes any time at all!

Of course any time I say Foreman's Grill, you can use a pan and cook on top of the stove, but if you're going to invest in one appliance (and by invest I mean as little as $20), this might just be the one.

For Turkey Burgers;
Turn on the grill and let it heat up - mine has no temp age so just let it heat.

Ground turkey - one package (about 1lb)
One packet of dry salad dressing mix - Good Season's has several varieties (http://brands.kraftfoods.com/goodseasons/flavors/dry-salad-dressing-and-recipe-mix/)  I like the garlic and herb variety for this recipe
Whole butter lettuce leaves (or iceberg, or romain - any large leaf salad green will do)
2 or 3 think slices of beefsteak tomato (or heirloom or whatever kind of tomato you like)
A good smear of homemade mayo

In a large bowl, mix one package of ground turkey, with one package of the dressing mix.  When the mix is thoroughly incorporated, divide the turkey into three to four equal parts.  I usually use those snack sized zipper baggies, and shape and flatten the patties so I can freeze them.  They come up out as single serving rectangles that are easy to pop on the grill later.

Place the patty on the Foreman Grill, and let it cook - about 7 min then turn it over - you can make fancy grill marks if you give it a quarter turn when you flip it - and cook for another 2 or 3 min. (Times are approximate)

While the burger is cooking, wash, dry and stack 2 leaves of butter lettuce for each "bun"
Add a smear of homemade mayo, and a couple of slices of tomato
Place the finished burger on the tomato, and add a couple bits of cheese if you like -I used brie
Top with two more washed dried leaves of lettuce

If you're watching your carb intake like I am, you can eliminate the tomatoes, although I love them and since the carb count is negligible, I choose to include them.

Summer BBQ envy - RESOLVED!!  WOO HOO!  Enjoy!